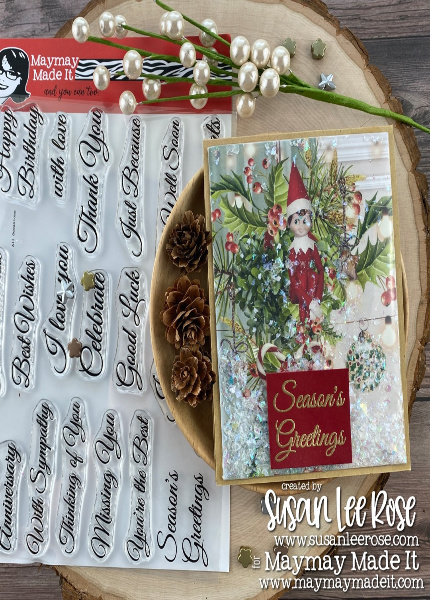
Hey, Y’all! It’s Susan Lee from @susanleeroseblog. I am ALWAYS on the lookout for quick Christmas cards. No matter how many I make each year, I always forget someone and want something I can whip up quickly.
I love Mintay paper, and the Merry & Bright 12” x 12” paper pack was no exception. BUT, there are always a few of those decorated papers that don’t immediately jump out as card making material. It would be perfect for quick scrapbook pages, but I struggled with using them in card making.
A while back, I saw a tutorial for making flat shaker cards, and it occurred to me that these papers would be perfect for this application!
Materials:
–Cardstock Trio Maymay & Brutus Monroe Lunchbag Cardstock https://bit.ly/3uUyCpL
–Merry & Bright Paper Pack from Mintay https://bit.ly/3ANYBTX
–Scrap of clear plastic packaging (like what stamp sets come in)
–All Occasions Stamp Set https://bit.ly/3kd80ym
–VersaMark Ink https://bit.ly/2UHyEVg
–Brutus Monroe Scarlet Cardstock https://bit.ly/3pxcoZU
–Gold Embossing Powder https://bit.ly/3xAGtLc
–Faux Snow
—Scotch Double-Sided Foam Mounting Tape https://bit.ly/3zid9dz
–Elizabeth Designs Double -Sided Tape https://bit.ly/3yTvtsF
–MISTI https://bit.ly/3y7oyM9
—Cutter Bee Scissors https://bit.ly/3v0jgjB
—EK Tools Powder Tool https://bit.ly/2Vy4OmO
–Bearly Art Precision Glue https://bit.ly/3rUZHs4
—Tonic Teflon Bone Folder https://bit.ly/3vroXsa
—WRMK Scoreboard https://bit.ly/3xKsrX6
–Paper Trimmer https://bit.ly/3h5WUIx
Instructions:
1. Cut out the paper and plastic packaging to the following measurements:
— Lunchbag: 4-1/4” x 11”, score at 5-1/2”
–Christmas scene paper: 5-1/4” x 4”
–Clear plastic packaging: 6” x 4-3/4”
–Scraps of Scarlet cardstock (big enough for sentiment)

2. Place the double-sided tape on all four edges of the backside of the Christmas scene paper.

3. Remove the backing from the double-sided tape on the bottom and both sides of the backside of the Christmas scene paper

4. Place the Christmas scene paper face down on top of the clear plastic packaging. Fold the packaging over to stick to the double-sided tape on the back of the Christmas scene paper. Leave the top open to fill the shaker front.

5. Add the faux snow to the front side of the flat shaker pocket.

6. Peel off the backing from the top strip of the double-sided tape. Fold the packaging over to stick to the double-sided tape on the back of the Christmas scene paper. The flat shaker element is complete

7. Attach the shaker card front to the lunchbag card base with glue. clamp around to hold in place while it dries.

8. Take a scrap of the scarlet cardstock and stamp the sentiment using VersaMark Ink. Sprinkle with gold embossing powder, and heat emboss.

9. Trim sentiment down to the desired size and attach to the card front using double-sided foam mounting tape.


