Hello, this is Brenda R. Coone, @mscraftprincess. I am still using the Flower Garden paper pad by Carta Bella. This paper is so pretty, and I am in a floral mood. When I saw the paper pad, I knew that it would pair well with the Garden Grow stamp set. This card doesn’t require much cutting or scoring and you can make several of them in one craft session.
Materials:
Garden Grow Stamp Set https://bit.ly/3usKW02
White 110 lb. cardstock https://bit.ly/3wz5vJz
Flower Garden 6 x 6 paper pad by Carta Bella https://bit.ly/34hFySZ
Teflon Bone Folder by Tonic Studios https://bit.ly/3hRoyuJ
Cutter Bee Scissors https://bit.ly/3vt7ord
Trimmer https://bit.ly/3hYWLZg
Bearly Art Precision Craft Glue https://bit.ly/3vrGOi9
Scoreboard https://bit.ly/3wDJWHM
Memento Tuxedo Black Dye Ink https://bit.ly/3oUfzKw
Various alcohol ink markers https://bit.ly/3fQVWiD
Ranger Distress Ink, Vintage Photo https://bit.ly/3oQP7Sa
Blender brush https://bit.ly/3i1bmUh
Cutting Guide:Cut the patterned paper for the front panel at 4” x 5 ¼”.
Cut second patterned paper for the shorter panels at 2” X 5 ¼”
Assembly instructions:1. Score card base on the 8 ½” side at 2 1/8” and 6 3/8”. Rotate to the 11” side and score at 5 ½”.

2. Burnish score lines

3. Cut one of the 2 1/8” panels and one of the 6 3/8” panels. Make sure they are either both at the top or bottom of the card base.

4. Your card base will look like this

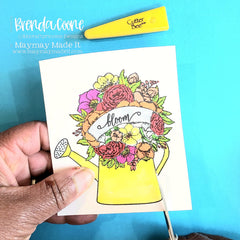
5. Stamp your image and the sentiment for the front of the card. Color your image.

6. Fussy the image. You can leave it on the panel and back it with a solid piece of colored cardstock. Also, Maymay has a SVG that you can use to cut the outline with your Cricut machine and then stamp it, but I was in the mood to fussy cut.
7. These are the patterned paper cuts. The front panel is 4 ¼” x 5”. The two shorter panels are cut at 2” X 5 ¼”.

8. Apply distress ink to the patterned paper. This gives a nice vintage look to the paper.
9. Adhere the patterned papers to the card base. The 4” x 5 ¼” panel goes on the front of the card and the two 2” x 5 ¼” panels are adhered to the side panels.

10. Adhere the image to the front of the card. Insert a sentiment and mail it.