Tools you’ll need:
Paper trimmer https://bit.ly/3cNJKhL
Score board https://bit.ly/3xKsrX6
Scoring tool https://bit.ly/3qZy6q2
Scissors https://bit.ly/3v0jgjB
Tonic Studios Teflon Bone folder https://bit.ly/3vroXsa
Bearly Arts Precision Craft Glue https://bit.ly/2TpxE7M
Gnome for the Holidays Stamp Set https://bit.ly/3xKrBKf
Echo Park Dots and Stripes https://bit.ly/3xIwpjc
Coordinating cardstock https://bit.ly/3pxcoZU
WRMK Envelope Punch Board
Nuvo Alcohol markers https://bit.ly/3g1etK8
Tim Holtz Distress Oxide (coordinating color) (optional) https://bit.ly/3dnMdzQ
Distress tool (optional) https://bit.ly/3qfjaDS
Fiskars stamping blocks https://bit.ly/3cEorya
VersaFine Onyx Black https://bit.ly/2OXKx6C
Hole punch (optional) https://bit.ly/3xK7coo
Ribbon https://bit.ly/3elCB9b
Cutting guide:
(4) 6 ½ x 6 (decorative cardstock)
6 ½ @ 1 ½ , 3, 4 ½ , and 6
6 @ 1 ½ and 4 ½
(2) 6 ¼ x 8 (solid cardstock)
6 ¼ @ 1 ½ and 4 ¾
8 @ 1 ½ and 3
(1) 1 ½ x 12 (decorative cardstock. Note: cut your decorative cardstock at the 6 ½ first so you can utilize the rest for your strip piece).

How to:
–Take your bone folder and smooth out your score lines.
–Starting with your 4 pieces that are 6 ½ x 6; on the long side you’re going to line up your cardstock on your WRMK envelope punch board at the 1 ½ guide (you made a 1 ½ score line, so that should help you out as well). Start with your decorative side down with the ½ inch flap folded over towards you. Make a punch and then fold over the next score line and repeat the process. You should have a total of 5 punches, including punching the edge on the non half inch flap side. You’ll do this to all 4 pieces.

–Take your scissors and remove the small rectangle at the corner. You’ll then cut up the score lines on the other end up to the joining score line to release the flaps.

–Fold over the side of the flap and add glue to the half inch flap and fold over the other side to adhere it together. You’ll then fold over the flaps and add glue to adhere it together to create the “box” shape.

–Add your treats or small gifts and tie off the top with some ribbon.
–Onto the other cardstock pieces. On the long side, you’ll cut up the score line on the 2 small boxes and cut to the join score line. Repeat on the other side.
–Starting at the bottom, you’ll fold up on the first 2 squares and add glue to the outside. Then attach it to the inside of the next squares. Then add glue to the outside of those squares and attach it to the inside of the rectangular flaps.

–Grab your scissors; starting on the “corner” of where you joined the squares, you’ll cut in a diagonal up to the corner of the score line. Repeat this to the other side. Repeat all the steps to the second cardstock.

–You’ll then add glue to the long backside of one of the carrying pieces and adhere to the back of the other piece to join them together. Optional: you can punch a hole create a place for your fingers to carry it or hang it from something.
–You’ll then take your decorative strip and wrap it around the base of the 1 ½ front. Wrap all the way around. You’ll notice that it doesn’t completely cover it, but you’ll be covering it up.
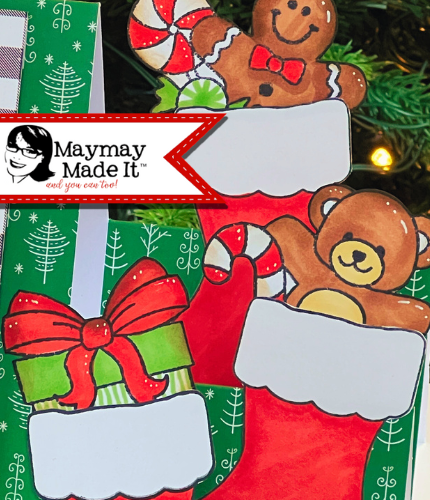
–Next you’ll take your stamping block, ink, and stamp set and stamp your images and sentiment on your white cardstock. I did light distressing on my cardstock just to not have my paper and images too white (this is optional). After you stamped all the images you’re going to use, color in your images using your NUVO alcohol markers.

–Take your detailing scissors and fussy cut out your images. Then you’ll apply your images to the front of your carrier (covering the gap from the strip) and add your sentiment.


There you have it! A different take on using your stamp sets for presenting a small gift from your “gnome” to another!