–BM Raven (Black), Alabaster (White), & Jurassic (Green) Cardstocks https://bit.ly/3pxcoZU
–Neenah Blue & Yellow Cardstocks https://bit.ly/3A4kGws
–His Pathways Stamp Set https://bit.ly/3DYMcya
–Memento Tuxedo Black Ink https://bit.ly/3z42EL3
–Versafine Onyx Black Ink https://bit.ly/2OXKx6C
–Dress My Craft Faux Stitching Border Bunch https://bit.ly/38KUxH1
–Nuvo Alcohol Markers https://bit.ly/3AijjdA
–Gelly Roll White Pen https://bit.ly/3kn1Ziy
–Fiskars Stamp Block Set https://bit.ly/3cEorya
–Scotch Double-Sided Foam Mounting Tape https://bit.ly/3zid9dz
–Bearly Precision Craft Glue https://bit.ly/3rUZHs4
–WRMK Scoring Board https://bit.ly/3xKsrX6
–Cricut 13″ Paper Trimmer https://bit.ly/3la4Yvi
–Cutter Bee Scissors https://bit.ly/3v0jgjB
–Tonic Teflon Bone Folder https://bit.ly/3vroXsa
–MISTI https://bit.ly/3y7oyM9
CUT GUIDE:
–Black Cardstock
(1) 7” x 8-1/2”, score at 3-1/2” to make the Slimline Card Base
(2) 3-5/8” x 8-1/2”, score at ¼” to make the tri-fold flap for card base
(2) 2” x 8-1/4” (x2)
–Light Blue Cardstock
(1) 3-1/4” x 8-1/4” (x2)
–Green Cardstock
(1) 1” x 8-1/4” (x2)
(2) 3-1/4” x 8-1/4”
(3) 3-1/8” x 8-1/4” (x2)
–Yellow Cardstock
(1) 1-7/8” x 8-1/2” (x2)
INSTRUCTIONS: 1. Cut and score all the paper according to the CUT GUIDE.

2. Assemble the card base by gluing the scored ¼” side of the 3-5/8” x 8-1/2” tri-fold piece to the 7” x 8-1/2” card base to form the completed tri-fold card base. Let dry.

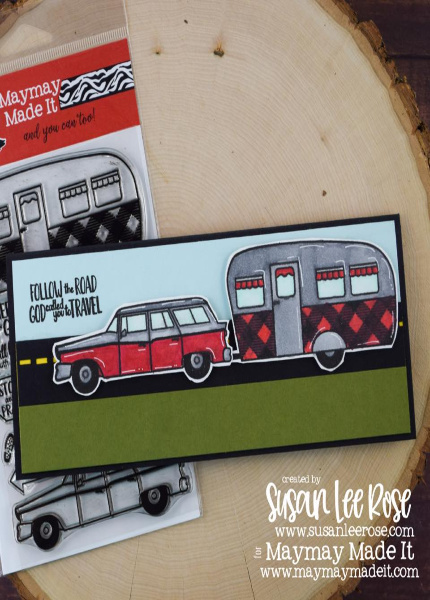
3. Build the road scene for the front and inside of the card. You will need to make 2.

–Take the 2” x 8-1/4” piece of black cardstock and punch one long edge
of it using the Faux Stitching Punch. Repeat for second piece.
–Glue the 1-7/8” x 8-1/2” piece of yellow cardstock to the back so that it
shows through the punched stitches. Repeat for second piece.
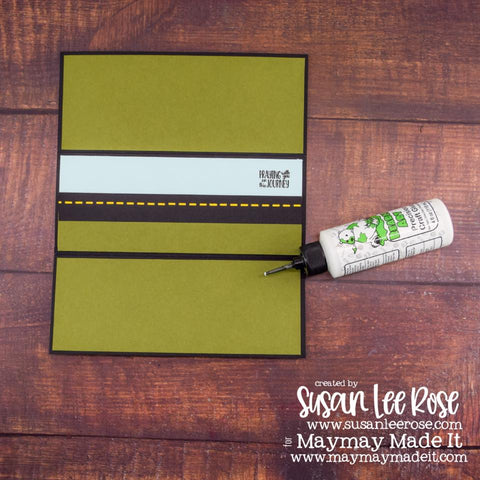
–Glue the 1” x 8-1/4” piece of the green cardstock to the bottom from of
the punched black strip (the opposite end from where you punched).
Repeat for second piece.
–Glue the road/grass strip to the bottom of the 3-1/4” x 8-1/4” piece of
light blue cardstock. Repeat for second piece.
4. Using a stamp block, stamp the font and inside sentiments to the road scenes you just created using the versafine ink.

5. Mount the completed road scenes to the front and inside of the card using glue.

6. Mount the two 3-1/8” x 8-1/4” pieces of green cardstock to the front and back of the inside flap of the card base. Mount the one 3-1/4” x 8-1/4” piece of green cardstock to the back side of the front flap.
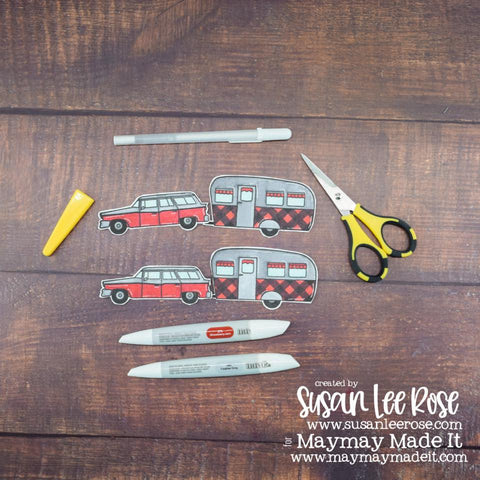
7. Stamp the car and RV images from the His Pathway stamp set 2 times each onto the white cardstock using the memento ink. Color images with the alcohol markers. Draw on highlights using the white gel pen. Fussy cut the images out using the cutter bees.
8. Mount one of the car and RV images to the scene on the front of the card using foam tape.

9. Mount the remaining car and RV images to the scene on the inside of the card using foam tape. Trim off the front of the car where it hangs off the page.