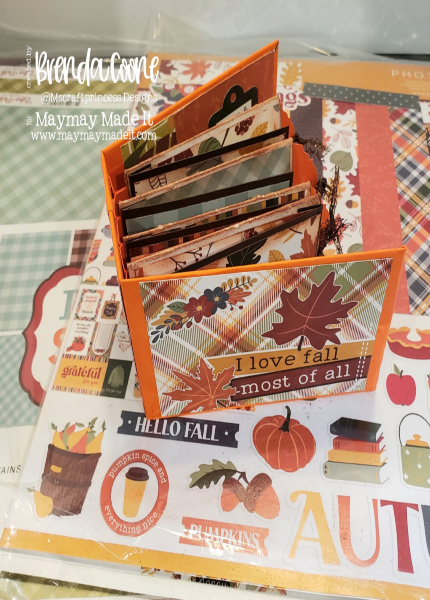
This is Brenda @mscraftprincess. I am here today with a mini album made from toilet paper roll holders. It is easy to make, and provides an opportunity to use some pretty paper from @maymaymade it and/ or you can stamp and color images, if desired. This album uses a hinge system. I made this a Fall themed album. These papers are fabulous. I hope you will give this project a try. Let’s get started!
Materials:
Echo Park 12 X 12 Fall Dots & Stripes Collection Kit https://bit.ly/3lqijhA
Photoplay 12 X 12 Autumn Greetings Paper and Stickers https://bit.ly/3zf9GeD
Neenah 8 ½” X 11” Astrobrights Cardstock (Orange and Brown sheets)
Scrap of brown ribbon (optional) https://bit.ly/3luUbdR
Scoring board https://bit.ly/3xKsrX6
Teflon Bone Folder by Tonic Studios https://bit.ly/3vroXsa
Paper Trimmer https://bit.ly/3h5WUIx
Bearly Art Precision Craft Glue https://bit.ly/2TpxE7M
Ranger Distress Ink (Vintage Photo) https://bit.ly/3qqbm2g
Tag die (optional) https://bit.ly/2XsOoNC
Graphic 45 Kraft Chipboard https://bit.ly/2XhKXZT
4 toilet paper roll holders
Disinfectant spray
Cut 4 pieces of dark brown cardstock at 4” x 2 ½”
Cut 8 pieces of patterned paper at 3 5/8” x 2 3/8”
Cut 4 pieces of patterned paper and 4 pieces of cardstock at 3 5/16” x 2 ¼”
Cut 2 chipboard pieces at 4 3/4” x 3. These are the covers for the mini album.
Cut 1 chipboard piece at 2 ½ “ x 3”. This is the spine for the mini album.
Cut 1 sheet of orange cardstock at 2 ¼ “ X 11”. This is the hinge for the mini album.
Cut 2 sheets of orange cardstock at 5 ½ “ x 11. They will be glued together to make the cover of the mini album.
Assembly instructions:
–The first step for me was to spray the toilet paper roll holders with disinfectant spray. This just made me feel better about using the roll holders.
–Flatten the roll holders and distress the edges with distress ink. I used Vintage Photo.

–Take the 4 brown pieces of cardstock and score them at ½”. Burnish the score lines and glue the flaps to each toilet paper roll.

–Cut all of the chipboard pieces that will form the album cover.

–Glue them to the orange cardstock to form the cover of the album.

–Score the hinge piece as follows: 1 ½“, 2”, 2 ¾ “, 3 ½ “, 4”, 4 ¾ “, 5 ½ “, 6”, 6 ¾ “, 7 ½ “, 8”, 8 ¾”, 9 ½”.
–Fold the hinge piece on the ¾” lines. This will create 4 hinges that the roll holder “pages” will be glued to. Glue the hinge to the album.

–Glue all of the patterned paper to either side of each roll holder, including the flaps made with the brown cardstock.

–Cut the tags using dies or scissors. Place ribbon in the holes of the tags and slide them in the open end of each roll holder.

–There are wonderful stickers in the Photo Play paper and sticker pack, and I used them to embellish the pages of the album.