Supplies needed:
Blessings Stamp Set https://bit.ly/39X1aGU
Scrap of white card stock https://bit.ly/3jjVOeQ
Memento Tuxedo Black Ink https://bit.ly/3z42EL3
X-Press It Paper Blending Card https://bit.ly/3mib4bP
Brutus Monroe Masking Paper https://bit.ly/3A09cJP
Nuvo Markers https://bit.ly/3AijjdA
Dress My Craft Scalloped Rectangle Die https://bit.ly/3F7vDR5
Brutus Monroe Macchiato Card Stock https://bit.ly/3pxcoZU
Photo Play Autumn Greetings 12 x 12 Paper Pack
Neenah Solar White 110 lb Card Stock https://bit.ly/2Y7164K
Art Glitter Glue https://bit.ly/2TpxE7M
Dress My Craft Paper Trimmer https://bit.ly/3cNJKhL
Distress Oxide Ink – Vintage Photo https://bit.ly/3qqbm2g
Ink blending tool https://bit.ly/3qfjaDS
Versa Fine Clair Ink – Acorn https://bit.ly/3wYCsze
Cutting Guide:
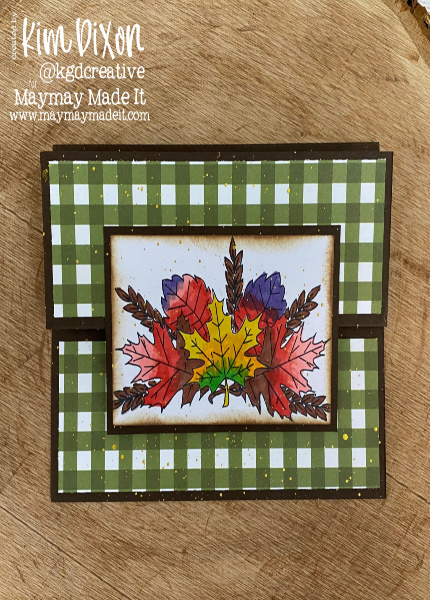
Card Base – Brutus Monroe Macchiato Card Stock – 8 ½” x 5 ½” – score along the 8 ½” side at 2” and 4¼”
Mat for the colored image – cut ¼” larger than the image. This mat was cut 2 3/8” x 3 ¾”
Card Mats – Green plaid from the Autumn Greetings Paper Pack – Cut 2 pieces 1 ¾” x 5 ¼”.
Neenah Solar White – 2” x 5 ¼”
Directions:
1. On a scrap piece of cardstock, map out how you want your stamped images to layer. Once you decide which stamped image goes in front versus behind, you’re ready to start stamping on your Xpress-It Blending Card.

2. When masking, you want to stamp the images you want in front first…stamp front to back. So, stamp the leaf you want in front first, then stamp that same image on the masking paper. Fussy cut the image stamped on the masking paper and place over the image on the blending card. Continue in this method until the image is completely stamped out.

3. Color the image with Nuvo alcohol markers. The Xpress-It Blending Card allows your to blend colors that might not necessarily blend on regular card stock.

4. Cut the image with a die – I used the Dress My Craft Scalloped Rectangle Dies. This can easily be done with a paper trimmer, though.

5. Ink the edges of the image with Vintage Photo Distress Oxide Ink.

6. Adhere the green plaid card mats onto the card base. One should go on the front flap and one should go on the bottom of the inside of the card.

7. Adhere the white card mat to the upper portion of the inside of the card. Also, adhere the colored image to its mat and adhere it to the center of front flap with approximately ½ of the colored image hanging off of the flap. (MAKE SURE YOU DON’T ADD GLUE TO THE BOTTOM HALF OF THE COLORED AND MATTED IMAGE.)

8. Stamp a sentiment from the stamp set on the inside white card mat using Versa Fine Clair Acorn ink.

9. For extra interest, I splattered some gold splatters over all of the card.
10. Sign this card and send it off to a friend or family member who needs a little pick me up.

Thanks for checking out this tutorial.
Since this is my last post as a design team member, I want to take just a moment to thank all of you that have read my tutorials and watched my Design Team videos.
I have thoroughly enjoyed my time as a Maymay Made It Pictorial Design Team Member. I have made some sweet friends and have grown in my craft so much in the past year and I’m thankful for this opportunity.
Thank you all for your encouragement and support. I am not going far…I will still be around.
God bless all of you!


